


Advanced Customization Topics
About This Document
Audience
The Customizations and Example Pages
The following customizations are described and illustrated in this document:
HTML Form Example Page
To view the source code for this page and its supporting XSLT stylesheet, see Optional Example Materials.
Inline Frame Example page
To view the source code for this page and its supporting XSLT stylesheet, see Optional Example Materials.
For More Information
Many basic customizations, such as displaying a custom logo or changing colors and fonts, are not included in the scope of this document. For information on performing basic customization work and an overview of the search process, see Customizing the User Interface.
Some of the advanced customizations require you to set or modify query parameters. For more information on query parameters, see the Search Protocol Reference and Using Front End Search Parameters.
Support Limitations
Integrating Search into Web Pages
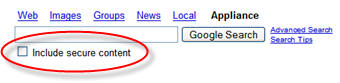
Presenting the Search Interface in an Inline Frame
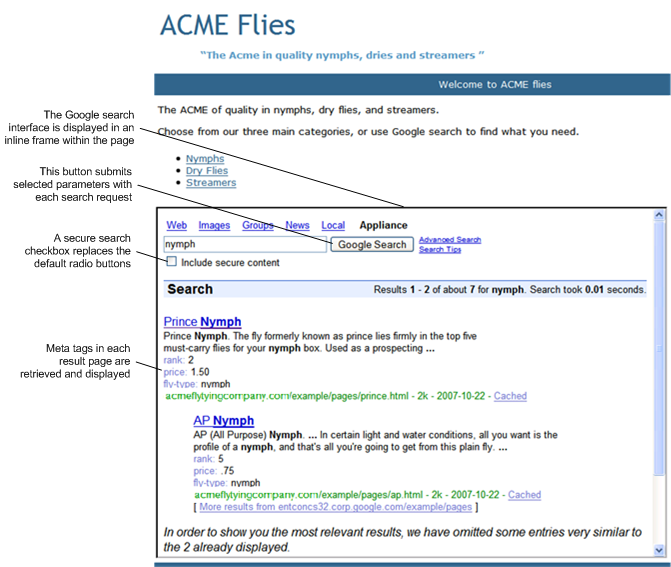
Using inline frames, you can present the search interface within the context of an otherwise static web page as illustrated in the Inline Frame Example page.
HTML Code for Integrating Search with an Inline Frame
The integrated search interface in the example page is derived from an inline frame tag with a src attribute pointing to iframe-example-frontend. As shown below, the inline frame is presented within a table cell:
<table border="0" cellpadding="0" cellspacing="0" width="800">
<tr><td>
<p>Search our extensive database of flies:</p>
<tr><td>
<iframe id="iFrame" name="FlyFrame" frameborder="0" width="800" height="700" scrolling="auto"
OnLoad="window.scroll(0, 0);" src="http://appliance_hostname/search?site=default_collection
&client=iframe-example-frontend&output=xml_no_dtd&proxystylesheet=iframe-example-frontend"></iframe>
</td></tr>
</table>
At a minimum, the source attribute for an inline frame tag must specify the protocol and search appliance hostname, http://appliance_hostname. If you provide only the hostname, the default front end search interface appears in the inline frame.
In the inline frame example, the source URL contains custom query parameters to load the front end named iframe-example frontend, which is customized for optimal display of the search interface in an inline frame. The front end includes XSLT code that makes the search button submit selected parameters that affect the display of the search results page. For more information, see Specifying Query Parameters with XSLT and the Search Protocol Reference.
Adding Inline Frame Search to a Page
To add the search interface inside an inline frame in a web page:
|
3.
|
For the src attribute of the inline frame tag, specify http://appliance_hostname, where the host name is the correct value for your search appliance. This value points to the default front end. If you want to open a different front end, or customize any other query parameters for the search interface, add them to the URL as shown in the example code.
|
|
4.
|
Optionally, set the frame width and height attributes to make sure the inline frame is large enough to accommodate the search results page. Add a noresize attribute if you want to prevent end users from changing the size. You can set any optional attributes of the inline frame (scrolling, align, and so on.) depending on your design goals for the page.
|
Creating an HTML Form Search Box
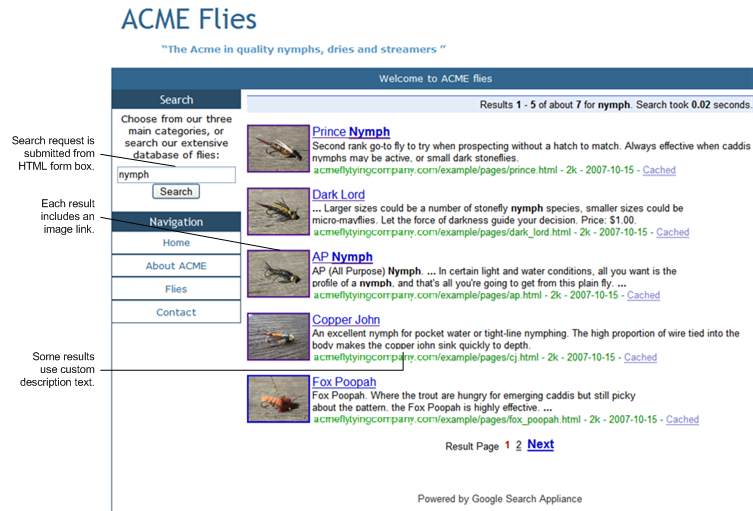
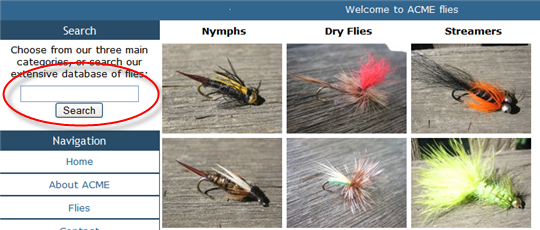
With a simple HTML form such as the one depicted in the HTML Form Example Page, you can integrate a simple search box directly into your web page instead of using the default search page. This approach allows an end user to focus on the page content with minimal distraction from the search interface. However, if the user needs to perform a search, the search box is readily available, as shown below.
HTML Code for a Form Search Box
The HTML code for the search box used in the example is derived from a form tag in the side navigation of the page.
<form method="GET" target="FlyFrame" action="http://appliance_hostname/search">
<input type="text" name="q" size="32" maxlength="256" value="" />
<input type="submit" name="btnG" value="Search" />
<input type="hidden" name="site" value="default_collection" />
<input type="hidden" name="client" value="example-frontend" />
<input type="hidden" name="output" value="xml_no_dtd" />
<input type="hidden" name="proxystylesheet" value="example-frontend" />
<input type="hidden" name="filter" value="p" />
<input type="hidden" name="getfields" value="*" />
</form>
This form submits a GET request to the search engine, requesting results in the format specified by example-frontend. The example form includes optional input fields for a submit button and for query parameters that enhance the visual effect of the page. These parameters turn off duplicate directory filtering (filter), retrieve meta tag values (getfields), and specify the stylesheet associated with example-frontend (proxystylesheet).
The requirements for an HTML for search box are:
|
•
|
|
•
|
|
•
|
Unless you intend to retrieve raw XML results, specify proxystylesheet
|
In addition to the required fields, you can include any valid query parameter as a hidden input field in the HTML form. See the Search Protocol Reference for more information on query parameters.
Adding an HTML Form Search Box to a Page
To add an HTML form search box to a web page:
|
2.
|
In the section of the page where you want to display the search box, add a form tag like the following, where appliance_hostname is the correct value for your search appliance:
|
<form method="GET" action="http://appliance_hostname/search">
|
3.
|
Inside the form tag, add a text input field named q, and provide values for size and maximum length (the absolute search appliance limit is 2048 characters):
|
<input type="text" name="q" size="32" maxlength="256" value="">
|
4.
|
Inside the form tag, add the required query parameters site, client, and output as hidden input fields:
|
<input type="hidden" name="site" value="default_collection">
<input type="hidden" name="client" value="default_frontend">
<input type="hidden" name="output" value="xml_no_dtd" />
|
5.
|
Unless you intend to retrieve raw XML results, specify a valid value for proxystylesheet. Typically, this value is the name of the front end you specified for client.
|
<input type="submit" name="btnG" value="Search">
Combining an HTML Form Search Box with Inline Results
This approach is used in the HTML Form Example Page. The HTML form in this example page collects the search terms in a custom search box, submits them to the search engine, and then directs the results page to open in the inline frame “FlyFrame” as specified by the target attribute in the form tag:
<form method="GET" target="FlyFrame" action="http://appliance_hostname/search">
When using this approach, you may prefer to remove redundant search boxes from the results page by setting the XSLT stylesheet variables show_top_search_box and show_bottom_search_box to zero.
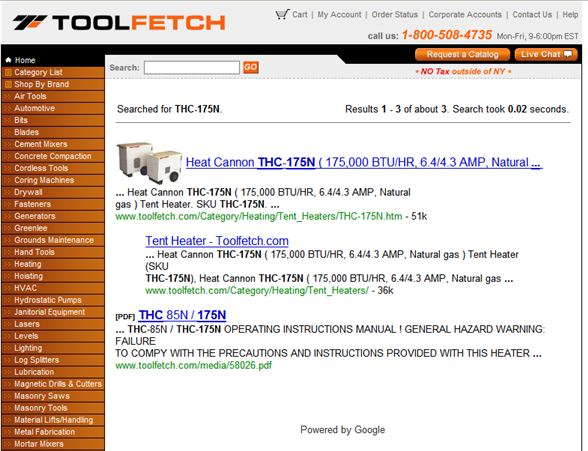
A production web site using a form box and inline frame at the time of writing is Toolfetch.com:
Modifying the Search Query
Replacing the Secure Search Radio Button with a Check Box
Using a check box for secure search saves space on the search query page and gives it a cleaner look. The following screen capture from iframe_index.html depicts a customized search box in place of the default radio buttons:
XSLT Code for the Secure Search Checkbox
This customized search box is defined by XSLT rules in the stylesheet associated with iframe-example-frontend. In this stylesheet, the default code for the search box input form is overwritten with the following block of custom code.
<xsl:choose>
<xsl:when test="$access='p'">
<input type="checkbox" name="access" value="a" />
</xsl:when>
<xsl:otherwise>
<input type="checkbox" name="access" value="a" checked="checked" />
</xsl:otherwise>
</xsl:choose>
Include secure content
This conditional clause with <choose> tests the value of the access parameter, and then defines the checkbox accordingly. When access is the default value of “p,” the unchecked box sets the value to “a” if checked by the end user. If the value is already set to “a,” the checkbox is displayed checked.
For more information on the access query parameter, see the Search Protocol Reference.
Adding Secure Search Checkbox Code to an XSLT Stylesheet
To modify a stylesheet to replace the secure search radio buttons with a checkbox:
<!-- **********************************************************************
Search box input form (Types: std_top, std_bottom, home, swr)
********************************************************************** -->
<xsl:if test="$show_secure_radio != '0'">
<xsl:if test="$show_secure_radio != '0'">
<tr>
<td colspan="2">
<font size="-1">
<!-- Start cut. Between here and End cut is the code you
must replace with the secure search checkbox code. -->
Search:
<xsl:choose>
<xsl:when test="$access='p'">
<label><input type="radio" name="access" value="p" checked="checked"
/>public content</label>
</xsl:when>
<xsl:otherwise>
<label><input type="radio" name="access" value="p"/>
public content</label>
</xsl:otherwise>
</xsl:choose>
<xsl:choose>
<xsl:when test="$access='a'">
<label><input type="radio" name="access" value="a"
checked="checked" />public and secure content</label>
</xsl:when>
<xsl:otherwise>
<label><input type="radio" name="access" value="a"/>
public and secure content</label>
</xsl:otherwise>
</xsl:choose>
<!-- End cut. Between here and Start cut is the code you
must replace with the secure search checkbox code. -->
</font>
</td>
</tr>
</xsl:if>
|
4.
|
Replace the default code with the custom code shown below in boldface and bracketed by start/end comments below.This replaces the default radio button's choose clause with similar logic appropriate for a checkbox.
|
<xsl:if test="$show_secure_radio != '0'">
<tr>
<td colspan="2">
<font size="-1">
<!-- Start paste. Between here and End paste is the correct
location for the secure search checkbox code. -->
<xsl:choose>
<xsl:when test="$access='p'">
<input type="checkbox" name="access" value="a" />
</xsl:when>
<xsl:otherwise>
<input type="checkbox" name="access" value="a" checked="checked" />
</xsl:otherwise>
</xsl:choose>
Include secure content
<!-- End paste. Between here and Start paste is the correct
location for the secure search checkbox code. -->
</font>
</td>
</tr>
</xsl:if>
|
5.
|
|
7.
|
Specifying Query Parameters with XSLT
The default search box for a front end is defined by the associated XSLT stylesheet. You can modify the XSLT stylesheet to include selected parameters in every query submitted from the query box in a front end. Valid parameters are documented in the Search Protocol Reference.
Though it is not immediately apparent, the search box in the Inline Frame Example page is customized in this way. Each query submitted from the search box explicitly retrieves selected meta tag values and limits the number of results to optimize the limited page space.
XSLT Code for Specifying Query Parameters
The source attribute of the inline frame tag in the Inline Frame Example page points to the customized front end, iframe-example-frontend. This front end submits selected parameters as defined by the XSLT code shown in bold at the bottom of the following code example.
<!-- *** form_params: parameters carried by the search input form *** -->
<xsl:template name="form_params">
<input type="hidden" name="filter" value="0"/>
<xsl:for-each
select="PARAM[@name != 'q' and
@name != 'ie' and
not(contains(@name, 'as_')) and
@name != 'btnG' and
@name != 'btnI' and
@name != 'site' and
@name != 'filter' and
@name != 'swrnum' and
@name != 'start' and
@name != 'access' and
@name != 'ip' and
(@name != 'epoch' or $is_test_search != '') and
not(starts-with(@name ,'metabased_'))]">
<input type="hidden" name="{@name}" value="{@value}" />
<xsl:if test="@name = 'oe'">
<input type="hidden" name="ie" value="{@value}" />
</xsl:if>
<xsl:text>
</xsl:text>
</xsl:for-each>
<xsl:if test="$search_collections_xslt = '' and PARAM[@name='site']">
<input type="hidden" name="site" value="{PARAM[@name='site']/@value}"/>
</xsl:if>
<!--Add these fields to every query string submitted from this front end-->
<input type="hidden" name="getfields" value="rank.price.fly-type" />
<input type="hidden" name="num" value="3" />
</xsl:template>
When users click the search button in this front end, getfields="rank.price.fly-type" and num="3" are included in the search request along with the standard parameters. Consequently, the result set will be limited to three results per page, and the specified meta tags will be retrieved for each result.
Adding Query Parameters to a Search Form
To add query parameters to a front end by modifying the associated stylesheet:
<!-- **********************************************************************
Search Parameters (do not customize)
********************************************************************** -->
|
3.
|
Within the Search Parameters section, find the section beginning with <!-- *** form_params: parameters carried by the search input form *** -->. This section contains an XSLT template named form_params.
|
|
4.
|
Scroll to the end of the form parameters template, <xsl:template name="form_params">.
|
|
5.
|
Between the template's closing tag and the preceding </xsl:if> tag, add hidden input fields for all parameters you want to submit from the search form. For example, to retrieve all meta tag values in the results, add this line:
|
<input type="hidden" name="getfields" value="*" />
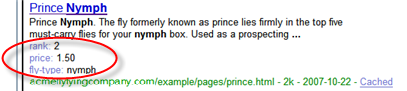
Displaying Meta Tag Values in Results
The custom front end for the Inline Frame Example page is configured to show meta tags in the results. Each result displays the three meta tags, rank, price, and fly-type, that are explicitly retrieved by the custom search form:
To modify a front end to show meta tags in results:
|
3.
|
Inside this section, s et the variable show_meta_tags to a non-zero value:
|
<xsl:variable name="show_meta_tags">1</xsl:variable>
|
5.
|
Make sure that the search parameter getfields is included in search requests, and that it is assigned the correct values to retrieve the desired meta tags. For more information on the getfields query parameter, see the Search Protocol Reference.
|
Enhancing Search Results
Including an Image Link for Results
Placing small images in the search results enhances the visual appeal of the results page. Because experience has trained many users to click icons and pictures, it is helpful to make each image a link to the search result, just as the result title is a link to the result. The HTML Form Example Page shows image links presented in the results pages.

XSLT Code for Image Links
The thumbnail-sized image links in the example pages are derived from a small block of XSLT code added after the variable declarations in the “single result” section of example-frontend_stylesheet.en.xslt. To find this block in the example stylesheet, search for the comment text “<!--Include image” and look for the following code:
<!--Include image from meta tag in results list-->
<xsl:for-each select="MT">
<xsl:if test="@N='product-image' and @V!=''">
<a href="{$protocol}://{$escaped_url}">
<img align="left" height="60" width="80" src="{@V}"/>
</a>
</xsl:if>
</xsl:for-each>
The XSLT image block iterates through each MT (meta tag) element in the result set and tests for non-empty values for the tag product-image. Then it includes the meta tag value inside a link to the results URL as represented by the concatenated variables protocol and escaped_url.
Image Meta Tag
Each product description page in this example includes a meta tag named product-image containing an absolute link to a thumbnail image. Because relative links do not work in the search results page, the meta tag values must be absolute links. For example, on mywebserver the prince nymph example page would include this meta tag:
<meta name="product-image" content="http://www.mywebserver.com/example/images/prince_small.jpg" />
The exact meta tag name is important, because it is required as a value for the search request parameter getfields and also it is tested in a conditional clause in the XSLT code. All pages for which you want to present a results image must include a meta tag like this one, with the name properly referenced in the stylesheet and in getfields.
You must explicitly retrieve the meta tags you want from the result set in order for them to be transformed by the XSLT code. You can do this by adding getfields="meta_tag_name" to your search request, or use getfields="*" to retrieve all meta tags. See the Search Protocol Reference for more information on adding query parameters to the search request.
Adding Image Link Code to your XSLT Stylesheet
To modify a stylesheet to include image links in the results:
<!-- **********************************************************************
A single result (do not customize)
********************************************************************** -->
<!-- *** Indent as required (only supports 2 levels) *** -->
<!--Include image from meta tag in results list-->
<xsl:for-each select="MT">
<xsl:if test="@N='meta_tag_name' and @V!=''">
<a href="{$protocol}://{$escaped_url}">
<img align="left" height="60" width="80" src="{@V}"/>
</a>
</xsl:if>
</xsl:for-each>
|
5.
|
Replace meta_tag_name with the name you have assigned to the meta tags storing your image link data. See Image Meta Tag for more information.
|
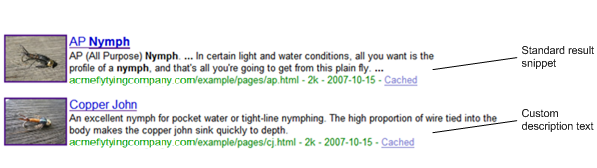
Replacing the Result Snippet with Custom Text
For the fictional fishing fly business of the example pages, imagine that writers in the marketing department create succinct product descriptions for each item. The short descriptions are stored in meta tags and the longer descriptions are stored in the product page text. If the product page for a fly doesn't have a description tag, the results page uses the automated snippet derived from the page text. This approach is illustrated in the HTML Form Example Page, in which some results include a custom description and some results includes a standard result snippet with ellipses and search terms displayed in boldface.
XSLT Code for Custom Text
<!-- *** Snippet Box *** -->
<table cellpadding="0" cellspacing="0" border="0">
<tr>
<td class="s">
<xsl:if test="$show_res_snippet != '0'">
<xsl:call-template name="reformat_keyword">
<xsl:with-param name="orig_string" select="S"/>
</xsl:call-template>
</xsl:if>
Custom Description Snippet Box
<!-- *** Snippet Box *** -->
<table cellpadding="0" cellspacing="0" border="0">
<tr>
<td class="s">
<!--Use description meta tag, if non-empty, in place of snippet-->
<xsl:choose>
<xsl:when test="MT/@N='description' and MT/@V!=''">
<xsl:value-of select="MT[@N = 'description']/@V"/>
</xsl:when>
<xsl:otherwise>
<xsl:call-template name="reformat_keyword">
<xsl:with-param name="orig_string" select="S"/>
</xsl:call-template>
</xsl:otherwise>
</xsl:choose>
The custom description snippet block displays the description for each result that has a description meta tag, or MT. If the XSLT engine does not find a valid description tag, it calls the standard template rules to display the auto-generated snippet element S.
The custom version includes the rule to display a standard snippet, but applies that template only if there is no valid description tag in the result. If you use this approach, make sure you have only one instance of the reformat_keyword template that selects the snippet element.
Description Meta Tag
Most of the product pages in this example includes a meta tag named description that contains a brief description of the product. For example, the copper john nymph page includes this meta tag:
<meta name="description" content="An excellent nymph for pocket water or
tight-line nymphing. The high proportion of wire tied into the body makes
the copper john sink quickly to depth." />
All pages for which you want to present custom text must include a meta tag like the above example, with the name properly referenced in the stylesheet and retrieved in the search request using the query parameter getfields. For pages that do not contain valid description tags, the stylesheet uses the automated snippet derived from page text.
You must explicitly retrieve the meta tags in the result set in order for them to be transformed by the XSLT code. Do this by adding getfields=description to your search request. For more information on getfields, see the Search Protocol Reference.
Adding Custom Text Code to an XSLT Stylesheet
To modify a stylesheet to replace the result snippet with custom text:
|
2.
|
Scroll to the section marked by the comment <!-- *** Snippet Box *** -->.
|
|
3.
|
Replace the fourth line of this section, <xsl:if test="$show_res_snippet != '0'">, with the following text:
|
<xsl:choose>
<xsl:when test="MT/@N='meta_tag_name' and MT/@V!=''">
<xsl:value-of select="MT[@N = 'meta_tag_name']/@V"/>
</xsl:when>
<xsl:otherwise>
|
4.
|
Replace the last line of this section, </xsl:if>, with the following text:
|
</xsl:otherwise>
</xsl:choose>
|
5.
|
Replace meta_tag_name with the name you have assigned to the meta tags storing your custom description text. See Description Meta Tag for more information.
|
Display Links in Dynamic Navigation to Sort Results by Metadata

.dn-block {
display: block;
}
.dn-sort-txt {
background-color: #E5ECF9;
font-weight: normal;
font-size: 90%;%
width: 100%;
}
.ac-renderer {
background: white;
border-bottom: 1px solid #558BE3;
|
2.
|
Move the line <xsl:template name="sort_by"> from above the <xsl:variable name="sort_by_url"> definition to below it.
|
<xsl:variable name="sort_by_relevance_url">
<xsl:value-of select="$sort_by_url"
/>&sort=date%3AD%3AL%3Ad1</xsl:variable>
<xsl:variable name="sort_by_date_url">
<xsl:value-of select="$sort_by_url"
/>&sort=date%3AD%3AS%3Ad1</xsl:variable>
<table><tr valign='top'><td>
<span class="s">
<xsl:choose>
<xsl:when test="/GSP/PARAM[@name = 'sort' and starts-with(@value,'meta')]">
<a ctype="sort" href="{$gsa_search_root_path_prefix}?{$sort_by_date_url}">{{MSG_sort_by_date}}</a>
<xsl:text> / </xsl:text>
<a ctype="sort" href="{$gsa_search_root_path_prefix}?{$sort_by_relevance_url}">{{MSG_sort_by_relevance}}</a>
</xsl:when>
<xsl:when test="/GSP/PARAM[@name = 'sort' and starts-with(@value,'date:D:S')]">
<xsl:template name="dn_meta_sort_link">
<xsl:param name="meta_name"/>
<xsl:param name="display_name"/>
<xsl:param name="tag_type"/>
<xsl:param name="direction"/>
<xsl:param name="language"/>
<xsl:variable name="numeric">
<xsl:choose>
<xsl:when test="$tag_type = 1">N</xsl:when>
<xsl:when test="$tag_type = 2">N</xsl:when>
<xsl:when test="$tag_type = 3">F</xsl:when>
<xsl:otherwise>D</xsl:otherwise>
</xsl:choose>
</xsl:variable>
<a ctype="sort"
href="{$gsa_search_root_path_prefix}?{$sort_by_url}&sort=meta%3A
{$meta_name}%3A{$direction}%3AS%3A{$language}%3AD%3A{$numeric}">
Sort Results by <xsl:value-of select="$display_name"/></a>
</xsl:template>
<xsl:template match="PMT">
<xsl:param name="dn_tokens"/>
<xsl:param name="partial_count"/>
<xsl:choose>
<xsl:when test="@IR = 1">
<ul class="dn-attr">
<li class="dn-attr-hdr"><span class="dn-attr-hdr-txt"><xsl:attribute
name="title"><xsl:value-of select="@DN" disable-output-escaping="yes"/>
</xsl:attribute><xsl:value-of select="@DN"/></span>
<div><span class="dn-sort-txt">
<xsl:call-template name="dn_meta_sort_link">
<xsl:with-param name="meta_name" select="$pmt_name"/>
<xsl:with-param name="display_name" select="@DN"/>
<xsl:with-param name="tag_type" select="@T"/>
<xsl:with-param name="direction">A</xsl:with-param>
<xsl:with-param name="language" select="/GSP/PARAM[@name='ulang']/@value"/>
</xsl:call-template>
</span></div></li>
<xsl:apply-templates select="PV">
<xsl:with-param name="pmt_name" select="$pmt_name"/>
<xsl:with-param name="dn_tokens" select="$dn_tokens"/>
<xsl:with-param name="partial_count" select="$partial_count"/>
</xsl:apply-templates>
</ul>
</xsl:when>
  <span class="dn-attr-hdr-txt"><xsl:attribute name="title">
    <xsl:value-of select="@DN" disable-output-escaping="yes"/>
</xsl:attribute><xsl:value-of select="@DN"/></span></div>
<div><span class="dn-sort-txt">
<xsl:call-template name="dn_meta_sort_link">
<xsl:with-param name="meta_name" select="$pmt_name"/>
<xsl:with-param name="display_name" select="@DN"/>
<xsl:with-param name="tag_type" select="@T"/>
<xsl:with-param name="direction">A</xsl:with-param>
<xsl:with-param name="language" select="/GSP/PARAM[@name='ulang']/@value"/>
</xsl:call-template>
</span></div></li>
</xsl:otherwise>
</xsl:choose>
<xsl:apply-templates select="PV[position() < $dyn_nav_max_rows + 1]">
<xsl:with-param name="pmt_name" select="$pmt_name"/>
<xsl:with-param name="header" select="@DN"/>
Configuring a Front End to Serve Secure and Public Results
To configure a front end to serve both secure and public results:
|
1.
|
In the admin console, click Search > Search Features > Front Ends.
|
|
2.
|
Click the Edit link next to a front end name in the list of front ends.
|
|
4.
|
Click the Edit Underlying XSLT Code link.
|
<xsl:variable name="access">
...
<xsl:otherwise>p</xsl:otherwise>
<xsl:otherwise>a</xsl:otherwise>
|
7.
|
Click Save.
|
Disabling Filtering for a Front End
You can disable duplicate snippet filtering and duplicate directory filtering for a search query by using the query parameter filter=0, as described in Search Protocol Reference. In addition, the search appliance supports disabling filtering for a front end by editing the XSLT stylesheet. See the following sections for steps for:
After editing the XSLT stylesheet, you might have to reload the stylesheet to see your changes. See Reloading the XSLT Stylesheet for more information.
Disabling Filtering for a Search Results Page
To disable duplicate snippet filtering and duplicate directory filtering for a search results page:
|
2.
|
Locate the <xsl:template name="form_params"> element.
|
|
3.
|
Add the following XSLT code right before the closing tag </xsl:template>.
|
<input type="hidden" name="filter" value="0"/>
<xsl:template name="form_params">
...
<input type="hidden" name="filter" value="0"/>
</xsl:template>
Disabling Filtering for an Advanced Search Results Page
To disable duplicate snippet filtering and duplicate directory filtering for a search results page:
<!--====Advanced Search Options======-->
<input type="hidden" name="filter" value="0"/>
The following example shows the modified code.
<input type="hidden" name="filter" value="0"/>
<!--====Advanced Search Options======-->
Reloading the XSLT Stylesheet
After saving the stylesheet, you might need to add &proxyreload=1 to the search URL to reload the XSLT stylesheet.
View the source of the search page to see that it includes the following tag: <input type="hidden" name="filter" value="0">.
Reference
Optional Example Materials
You do not need to set up the example materials in order to read and understand the custom code, but it may be helpful to see the customizations in the same context described in this document. Depending on whether you begin with index.html or iframe_index.html, the example site demonstrates the customizations depicted in the HTML Form Example Page or the Inline Frame Example page.
Setting up the Example
To set up the materials for testing in your search appliance:
|
2.
|
In the example files, search and replace all references to appliance_hostname with the host name of your search appliance.
|
|
3.
|
In the example files, search and replace all references to webserver_hostname with the host name of your web server.
|
|
5.
|
Create copies of the example stylesheets, and remove the .txt extension from the filenames. For example, example-frontend_stylesheet.en.xslt.txt becomes example-frontend_stylesheet.en.xslt.
|
|
6.
|
Create a front end named “example-frontend” and import the stylesheet example-frontend_stylesheet.en.xslt. See Customizing the User Interface for more information on creating front ends.
|
|
7.
|
Create a front end named “iframe-example-frontend” and import the stylesheet iframe-example-frontend_stylesheet.en.xslt.
|
After you have set up the example materials, run a test query on them by opening index.html and typing “nymph” or other key words from the example pages into the search box. The expected result looks like the HTML Form Example Page. To view the inline frame example, use the search box displayed in /pages/iframe_index.html.
Example Contents
Example index page and stylesheets:
|
•
|
|
•
|
Comparisons of Default and Customized Stylesheets
To locate and review customized XSLT code, it can be helpful to have a side-by-side comparison of the default and customized stylesheets. Google provides sxse, a side-by-side comparison tool at http://code.google.com/p/sxse/. You can also readily find other freeware tools for preparing such comparisons.