Postfixのメール(SMTP)テスト環境構築メモ
CentOS6上にPostfixのメール(SMTP)のテスト環境を構築した際のメモを残します。
Postfixのメールテスト環境目的
本テスト環境の目的は、環境内部からの環境内部へのメール送受信、およびPostfixの動作確認です。外部へのメールの送信、外部からのメール受信、実用的なメールサーバ構築は目的としていません。
以下の動作が確認可能な環境の構築および動作確認を行います。
- メールをローカルユーザのメールボックスに配送する。(delivery)
- メールをローカルのSMTPダミーサーバにリレーする。(relay)
本エントリでは、以下で構築したOSX上のCentOS6に構築します。
https://qiita.com/keikmobile/items/2c1cec8b875387a83a71
SElinuxは無効とすることを前提としています。
Postfixのメールテスト環境・動作確認方針
上記目的を実現するためのメールテスト環境構成・設定値・動作確認の方針・前提条件を記述します。
メールテスト環境プロセス構成方針
本メールテスト環境は以下のプロセス構成をとる方針とします。
- MTA(SMTPサーバ)はPostfixを使用する。
- リレー先のSMTPダミーサーバはPostfixに含まれるsmtp-sinkコマンドを使用する。
- SMTPクライアントはtelnetおよび、Postfixに含まれるsmtp-soruceコマンドを使用する。
- 上記のプロセスは全て同一のCent OS上に構成する。
- 以下は各コンポーネントのイメージ。(http://plantuml.com/)
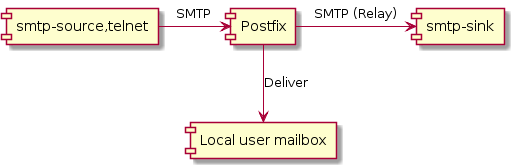
@startuml
[smtp-source,telnet] -right-> [Postfix] : SMTP
[Postfix] -right-> [smtp-sink] : SMTP (Relay)
[Postfix] -down-> [Local user mailbox] : (Deliver)
@enduml
Postfix設定構成方針
Postfixの振る舞いを設定する設定値は以下の方針で決定します。
- ローカルユーザのメールボックスへの配送(外部からのメッセージを受けない)のためのドメインは.localhostとする。(https://tools.ietf.org/html/rfc2606#section-2)
- ローカルユーザ宛以外のリレー先は、ローカルのSMTPダミーサーバとする。
- メールボックスの形式は、Maildir(qmail)形式とする。
動作確認方針
本テスト環境の動作確認は以下の方針で実施します。
- ローカルユーザのメールボックスへの配送の動作の確認を行う。以下の確認観点で行う。
- SMTPクライアントへの応答
- ローカルメールボックスのメッセージファイル
- Postfixのログ(/var/log/maillog)
- ローカルのSMTPダミーサーバーにリレーの動作の確認を行う。以下の確認観点で行う。
- SMTPクライアントへの応答
- SMTPダミーサーバの出力
- Postfixのログ(/var/log/maillog)
Postfixのメールテスト環境構築手順
postfixのインストール
yumでpostfixをインストールし、rpmでインストールされたことを確認します。smtp-source,smtp-sinkコマンドもインストールされます。
chkconfigで起動設定を有効化します。
メールの送信確認で使用するtelnetコマンドもインストールします。
$ sudo yum -y postfit telnet
...
$ rpm -qa | egrep 'postfix|telnet'
...
$ chkconfig postfix on
...
Postfixの設定(main.cf)
前述のPostfix設定構成方針に従い、Postfixの設定を行います。
main.cfの以下設定値を書き換えます。
- /etc/postfix/main.cf
| 設定 | 設定値 | Note |
|---|---|---|
| myhostname | host.localhost | メールシステムのホスト名を指定します。host.localhost宛のローカルでメールを受信するためhost.localhostを指定します。 ローカルで受信するメール設定の詳細は下記URLよりmydestination設定を参照ください。 |
| mydomain | localhost | メールシステムのドメイン名を指定します。localhost宛のメールを受信するためlocalhostを指定します。 ローカルで受信するメール設定の詳細は下記URLよりmydestination設定を参照ください。 |
| mynetworks_style | host | メールのリレー(中継)アクセス制御の設定を記述します。ローカルホストからのメールのみを信頼しリレー(中継)を許可する設定とするため、hostを指定します。 メールのリレー(中継)アクセス制御の設定の詳細は下記URLよりmynetworksを参照ください。 |
| relay_domains | 設定値削除 | リレーさせるドメインを指定します。mynetworks_styleで指定したローカルホストからのメールのみをリレーさせるため設定値を削除します。 |
| relayhost | 127.0.0.1:10025 | リレー先のホスト,ポートを指定します。本環境ではローカル宛以外のメールはダミーSMTPサーバを立て、ダミーSMTPサーバにリレーさせます。ダミーSMTPサーバのホスト・ポートを指定します。 |
| home_mailbox | Maildir/ | メールボックスファイルの形式、パスを指定します。ユーザのホームディレクトリのMaildir以下にMaildir(qmail)形式で作成するため、Maildir/を指定します。 |
main.cfのフォーマット、各種設定値の詳細は以下を参照。
http://www.postfix.org/postconf.5.html
以下はmain.cfのdefaultとのdiffです。
75c75
< #myhostname = host.domain.tld
---
> myhostname = host.localhost
83c83
< #mydomain = domain.tld
---
> mydomain = localhost
251c251
< #mynetworks_style = host
---
> mynetworks_style = host
296c296
< #relay_domains = $mydestination
---
> relay_domains =
317a318
> relayhost = 127.0.0.1:10025
419c420
< #home_mailbox = Maildir/
---
> home_mailbox = Maildir/
postconf -nコマンドで上記設定の確認をします。
$ postconf -n | egrep 'home_mailbox|mydestination|mydomain|myhostname|mynetworks_style|relay_domains|relayhost'
home_mailbox = Maildir/
mydestination = $myhostname, localhost.$mydomain, localhost
mydomain = localhost
myhostname = host.localhost
mynetworks_style = host
relay_domains =
relayhost = 127.0.0.1:10025
$
Maildirテンプレートの作成
Maildirのテンプレートを作成します。
$ sudo mkdir -p /etc/skel/Maildir/new
$ sudo mkdir -p /etc/skel/Maildir/cur
$ sudo mkdir -p /etc/skel/Maildir/tmp
$ sudo chmod -R 700 /etc/skel/Maildir/
postfixの再起動
serviceコマンドでpostfixの再起動を行います。
$ sudo service postfix restart
リレー先SMTPダミーサーバの起動
smtp-sinkでダミーサーバを立ち上げます。postfixのmain.cfのrelayhostで指定した127.0.0.1ホストの10025ポートで立ち上げます。メッセージはsink/%Y%m%d%H/%M.以下のファイルに出力されます。
$ smtp-sink -R /home/vagrant -u vagrant -d sink/%Y%m%d%H/%M. 127.0.0.1:10025 5 &
Postfixのメールテスト環境動作確認
ローカルユーザへのメール送信の確認(telnetコマンド)
telnetコマンドでローカルユーザへのメール送信の確認を行います。telnetでlocalhostの25ポートにアクセスし、SMTPコマンドでメールを送信します。ローカルユーザである"vagrant@localhost"宛に送信します。
$ telnet localhost 25
Trying 0.0.0.0...
Connected to localhost.
Escape character is '^]'.
220 host.localhost ESMTP Postfix
mail from:<>
250 2.1.0 Ok
rcpt to:<vagrant@localhost>
250 2.1.5 Ok
data
354 End data with <CR><LF>.<CR><LF>
test message
.
250 2.0.0 Ok: queued as 71D0620555
quit
221 2.0.0 Bye
Connection closed by foreign host.
$
vagrantユーザのホームディレクトリ以下のMaildir/new/に受信したメールを確認することができます。
$ cat Maildir/new/1514888325.Vfd01I160013M791677.centos601
Return-Path: <>
X-Original-To: vagrant@localhost
Delivered-To: vagrant@localhost.localhost
Received: from centos601 (centos601 [127.0.0.1])
        by host.localhost (Postfix) with SMTP id 71D0620555
        for <vagrant@localhost>; Tue,  2 Jan 2018 10:18:14 +0000 (UTC)
Message-Id: <20180102101827.71D0620555@host.localhost>
Date: Tue,  2 Jan 2018 10:18:14 +0000 (UTC)
From: MAILER-DAEMON
To: undisclosed-recipients:;

test message
$
また、/var/log/maillogに以下の例のログ出力が確認できます。
... postfix/smtpd[4493]: connect from centos601[127.0.0.1]
... postfix/smtpd[4493]: 71D0620555: client=centos601[127.0.0.1]
... postfix/cleanup[4496]: 71D0620555: message-id=<20180102101827.71D0620555@host.localhost>
... postfix/qmgr[4236]: 71D0620555: from=<>, size=337, nrcpt=1 (queue active)
... postfix/local[4497]: 71D0620555: to=<vagrant@localhost.localhost>, orig_to=<vagrant@localhost>, relay=local, delay=31, delays=31/0.01/0/0, dsn=2.0.0, status=sent (delivered to maildir)
... centos601 postfix/qmgr[4236]: 71D0620555: removed
... centos601 postfix/smtpd[4493]: disconnect from centos601[127.0.0.1]
smtp-sourceでのメール送信
telnetコマンドでなく、smtp-sourceコマンドでメールを送信することも可能です。
$ smtp-source -v -f "" -t "vagrant@localhost" 127.0.0.1:25
smtp-source: name_mask: all
smtp-source: vstream_tweak_tcp: TCP_MAXSEG 32732
smtp-source: <<< 220 host.localhost ESMTP Postfix
smtp-source: HELO centos601
smtp-source: <<< 250 host.localhost
smtp-source: MAIL FROM:<>
smtp-source: <<< 250 2.1.0 Ok
smtp-source: RCPT TO:<vagrant@localhost>
smtp-source: <<< 250 2.1.5 Ok
smtp-source: DATA
smtp-source: <<< 354 End data with <CR><LF>.<CR><LF>
smtp-source: .
smtp-source: <<< 250 2.0.0 Ok: queued as 7CD2320555
smtp-source: QUIT
smtp-source: <<< 221 2.0.0 Bye
$
ローカルのSMTPダミーサーバーにリレーの確認(smtp-source)
smtp-sourceコマンドでリモートへのメール送信の確認を行います。リモートである"vagrant@host.remotehost"宛に送信します。
[vagrant@centos601 ~]$ smtp-source -v -f "" -t "vagrant@host.remotehost" 192.168.33.10:25
smtp-source: name_mask: all
smtp-source: vstream_tweak_tcp: TCP_MAXSEG 32741
smtp-source: <<< 220 host.localhost ESMTP Postfix
smtp-source: HELO centos601
smtp-source: <<< 250 host.localhost
smtp-source: MAIL FROM:<>
smtp-source: <<< 250 2.1.0 Ok
smtp-source: RCPT TO:<vagrant@host.remotehost>
smtp-source: <<< 250 2.1.5 Ok
smtp-source: DATA
smtp-source: <<< 354 End data with <CR><LF>.<CR><LF>
smtp-source: .
smtp-source: <<< 250 2.0.0 Ok: queued as 26C5F20574
smtp-source: QUIT
smtp-source: <<< 221 2.0.0 Bye
[vagrant@centos601 ~]$
また、/var/log/maillogに以下の例のログ出力が確認できます。
relay=127.0.0.1[127.0.0.1]:10025へrelayされていることが確認可能です。
... postfix/smtpd[26308]: connect from unknown[192.168.33.10]
... postfix/smtpd[26308]: 26C5F20574: client=unknown[192.168.33.10]
... postfix/smtp[26314]: 26C5F20574: to=<vagrant@host.remotehost>, relay=127.0.0.1[127.0.0.1]:10025, delay=0.13, delays=0.08/0/0/0.04, dsn=2.0.0, status=sent (250 2.0.0 Ok)