Make Sushi Cake and Win the Holidays
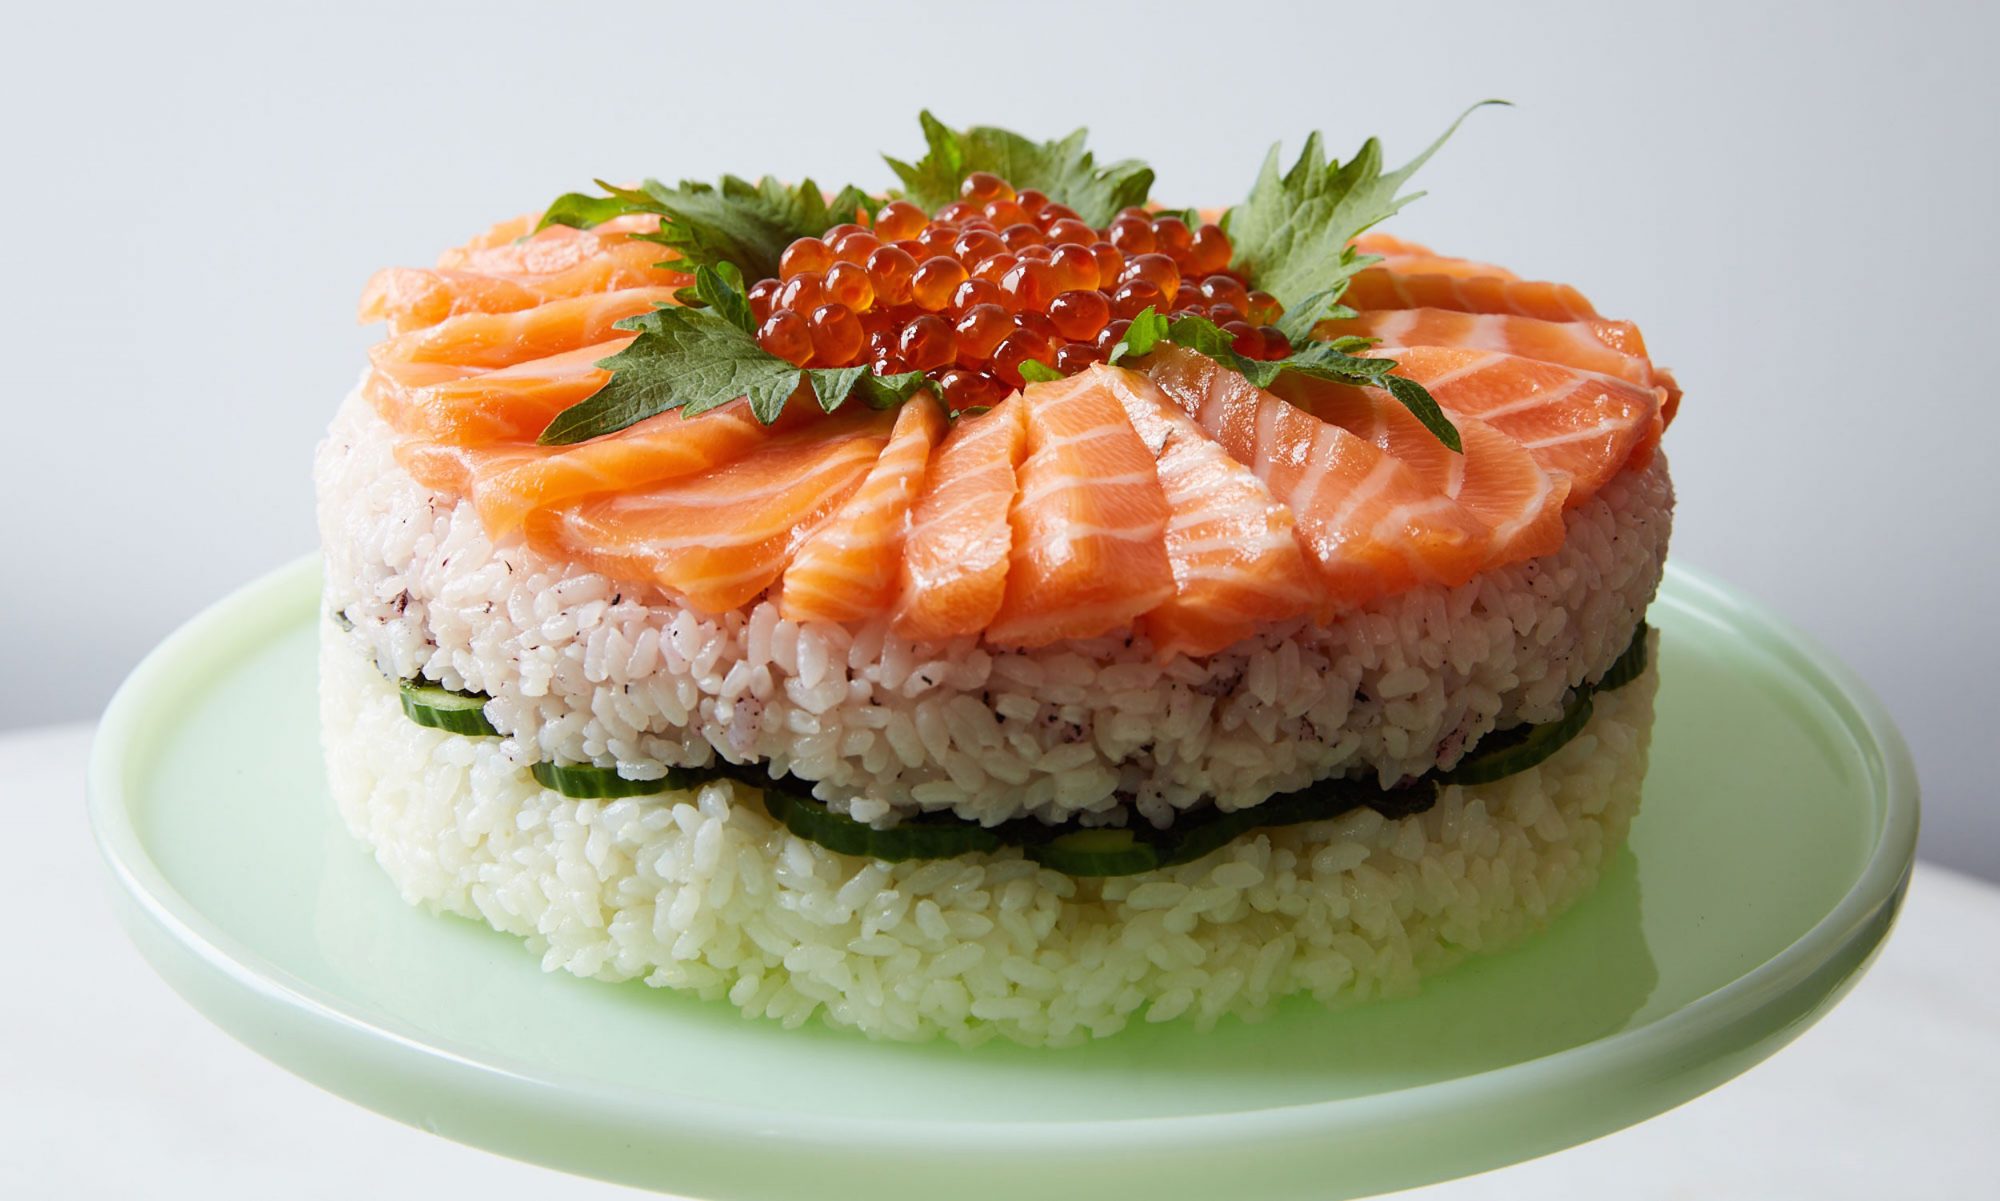
"Is it a cake that looks like sushi, or sushi in the shape of a cake?" my friends asked when I invited them over for sushi cake. It's the latter. And it's awesome.I was skeptical the first time I had one, at a party in the suburbs of Tokyo. It seemed like the kind of thing that looks cool on Instagram and Pinterest, but doesn't taste good in real life. Actually, it was great! And it makes sense: This is just a new shape for an old-school Japanese party food: chirashizushi, which is vinegared rice scattered with sashimi,and pickled vegetables, and strips of thin omelet, often served family-style.It's also a lot easier to make than most of those pretty (but impossible) things you see on social media. You don't need a recipe, just a lot of seasoned sushi rice (I've included instructions for that, below) and some toppings and fillings. The toppings can be anything that would taste good as sushi. Go to a fish store or Asian market and get a package of pre-cut sashimi if you're not up to slicing your own. Or you could make this vegan with umeboshi (pickled plums) and shiso. Top it with imitation crab and avocado, California roll-style. Add thin strips of omelet, Japanese pickles, slices of cucumber (all typical additions to chirashizushi). Basically, use whatever ingredients you like and can get your hands on. Here's how to make it:1. Choose your toppings and fillings. For toppings, I used a little over a half pound of good wild salmon that I cut up myself, 5 shiso leaves, and ikura (salmon roe) that I rinsed with sake and seasoned with a little soy sauce. I chose fillings that were less perishable so I could keep the cake at room temperature until my guests arrived and add the fish at the last minute. Between the layers of rice I used half an English cucumber and 1 sheet of sushi nori.2. Season half the rice with sushi vinegar, and the other half with umesu (plum vinegar) and a pinch of shiso powder, to make it a nice pink color. Alternately, you can mix it with furikake (Japanese markets sell a wide range of these rice seasoning sprinkles) or sakura denbu (a pink fishy rice seasoning). You'll need about 7 cups total of cooked sushi rice (recipe follows) to fill an 8-inch springform pan, but you can make this whatever size and shape you like. It doesn't hurt to cook some extra rice—you can use the leftovers for onigiri (rice balls) or fried rice to eat for lunch the next day.3. Line an 8-inch springform pan (or whatever kind of pan you want to use—even a skillet can work) with plastic wrap. 4. Fill the pan a little more than halfway with the pink rice. Use a piece of wax paper to press it down into an even firm layer. You want it to stick together, but you don't want to totally smash it into a hard puck.5. Tear the nori into small pieces (that way it will be easier to cut and eat the "cake" than if the nori is in a single sheet). Arrange them to cover the layer of rice.6. Next, make a layer of thin cucumber slices.7. Fill the pan the rest of the way with rice. It should be mounded up a little so that when you press it down it's level with the top.8. Press down the rice into a firm even layer (using wax paper to keep it from sticking to your hands), level with the top of the pan.9. Flip the pan over onto a cake stand or plate. This is where a springform pan makes things easier because you can just pop it open. Carefully remove the pan, and then the plastic wrap. You can make the cake up to this point, and then keep it a room temperature for a few hours before serving (refrigerating will make the rice hard and dry).10. Just before serving, arrange the toppings. I made a ring of salmon sashimi, placed the shiso leaves like flower petals, and put in ikura in the center.11. Slice and serve with soy sauce and wasabi.Sushi Rice