

まず最初にCentos7にApache httpdをインストール方法を教えますが複雑な説明はおいおい説明します
コマンドで yum info httpd を実行します
yum info httpdLoaded plugins: fastestmirror
Loading mirror speeds from cached hostfile
* base: ftp.iij.ad.jp
* epel: mirrors.sonic.net
* extras: ftp.iij.ad.jp
* updates: ftp.iij.ad.jp
Available Packages
Name : httpd
Arch : x86_64
Version : 2.4.6
Release : 97.el7.centos.5
Size : 2.7 M
Repo : updates/7/x86_64
Summary : Apache HTTP Server
URL : http://httpd.apache.org/
License : ASL 2.0
Description : The Apache HTTP Server is a powerful, efficient, and extensible
: web server.
パッケージが入っているのでそのままインストールしていきます。
パッケージが入っていない事はほぼありません。
ではhttpdをインストールします
下記のコマンドを実行してください
yum install httpd-*Loaded plugins: fastestmirror
Loading mirror speeds from cached hostfile
* base: ftp.iij.ad.jp
* epel: ftp.iij.ad.jp
* extras: ftp.iij.ad.jp
* updates: ftp.iij.ad.jp
Resolving Dependencies
–> Running transaction check
—> Package httpd.x86_64 0:2.4.6-97.el7.centos.5 will be installed
—> Package httpd-devel.x86_64 0:2.4.6-97.el7.centos.5 will be installed
—> Package httpd-itk.x86_64 0:2.4.7.04-2.el7 will be installed
—> Package httpd-manual.noarch 0:2.4.6-97.el7.centos.5 will be installed
—> Package httpd-tools.x86_64 0:2.4.6-97.el7.centos.5 will be installed
–> Finished Dependency ResolutionDependencies Resolved================================================================================
Package Arch Version Repository Size
================================================================================
Installing:
httpd x86_64 2.4.6-97.el7.centos.5 updates 2.7 M
httpd-devel x86_64 2.4.6-97.el7.centos.5 updates 200 k
httpd-itk x86_64 2.4.7.04-2.el7 epel 22 k
httpd-manual noarch 2.4.6-97.el7.centos.5 updates 1.3 M
httpd-tools x86_64 2.4.6-97.el7.centos.5 updates 94 k
Transaction Summary
================================================================================
Install 5 Packages
Total download size: 4.4 M
Installed size: 16 M
Is this ok [y/d/N]:
ここでy/d/nの選択を求められているのでy=yesの yを入力してエンターキーで決定します。
Loaded plugins: fastestmirror
Loading mirror speeds from cached hostfile
* base: ftp.iij.ad.jp
* epel: ftp.iij.ad.jp
* extras: ftp.iij.ad.jp
* updates: ftp.iij.ad.jp
Resolving Dependencies
–> Running transaction check
—> Package httpd.x86_64 0:2.4.6-97.el7.centos.5 will be installed
—> Package httpd-devel.x86_64 0:2.4.6-97.el7.centos.5 will be installed
—> Package httpd-itk.x86_64 0:2.4.7.04-2.el7 will be installed
—> Package httpd-manual.noarch 0:2.4.6-97.el7.centos.5 will be installed
—> Package httpd-tools.x86_64 0:2.4.6-97.el7.centos.5 will be installed
–> Finished Dependency ResolutionDependencies Resolved================================================================================
Package Arch Version Repository Size
================================================================================
Installing:
httpd x86_64 2.4.6-97.el7.centos.5 updates 2.7 M
httpd-devel x86_64 2.4.6-97.el7.centos.5 updates 200 k
httpd-itk x86_64 2.4.7.04-2.el7 epel 22 k
httpd-manual noarch 2.4.6-97.el7.centos.5 updates 1.3 M
httpd-tools x86_64 2.4.6-97.el7.centos.5 updates 94 k
Transaction Summary
================================================================================
Install 5 Packages
Total download size: 4.4 M
Installed size: 16 M
Is this ok [y/d/N]: y
Downloading packages:
(1/5): httpd-itk-2.4.7.04-2.el7.x86_64.rpm | 22 kB 00:00
(2/5): httpd-tools-2.4.6-97.el7.centos.5.x86_64.rpm | 94 kB 00:00
(3/5): httpd-devel-2.4.6-97.el7.centos.5.x86_64.rpm | 200 kB 00:00
(4/5): httpd-manual-2.4.6-97.el7.centos.5.noarch.rpm | 1.3 MB 00:00
(5/5): httpd-2.4.6-97.el7.centos.5.x86_64.rpm | 2.7 MB 00:01
——————————————————————————–
Total 3.3 MB/s | 4.4 MB 00:01
Running transaction check
Running transaction test
Transaction test succeeded
Running transaction
Installing : httpd-tools-2.4.6-97.el7.centos.5.x86_64 1/5
Installing : httpd-2.4.6-97.el7.centos.5.x86_64 2/5
Installing : httpd-devel-2.4.6-97.el7.centos.5.x86_64 3/5
Installing : httpd-itk-2.4.7.04-2.el7.x86_64 4/5
Installing : httpd-manual-2.4.6-97.el7.centos.5.noarch 5/5
Verifying : httpd-devel-2.4.6-97.el7.centos.5.x86_64 1/5
Verifying : httpd-itk-2.4.7.04-2.el7.x86_64 2/5
Verifying : httpd-tools-2.4.6-97.el7.centos.5.x86_64 3/5
Verifying : httpd-manual-2.4.6-97.el7.centos.5.noarch 4/5
Verifying : httpd-2.4.6-97.el7.centos.5.x86_64 5/5
Installed:
httpd.x86_64 0:2.4.6-97.el7.centos.5
httpd-devel.x86_64 0:2.4.6-97.el7.centos.5
httpd-itk.x86_64 0:2.4.7.04-2.el7
httpd-manual.noarch 0:2.4.6-97.el7.centos.5
httpd-tools.x86_64 0:2.4.6-97.el7.centos.5
Complete!
最後の行にCompleteがあれば完了しています
インストールしてもhttpd サービスが稼働していないので、httpd サービスを起動します。
起動方法は下記のコマンドを実行します。
systemctl start httpd次にブラウザでhttp://192.168.33.10にアクセスしてみます
もし、vagrantのprivate_net_workのipを変更しているなら変更したipを入力します。
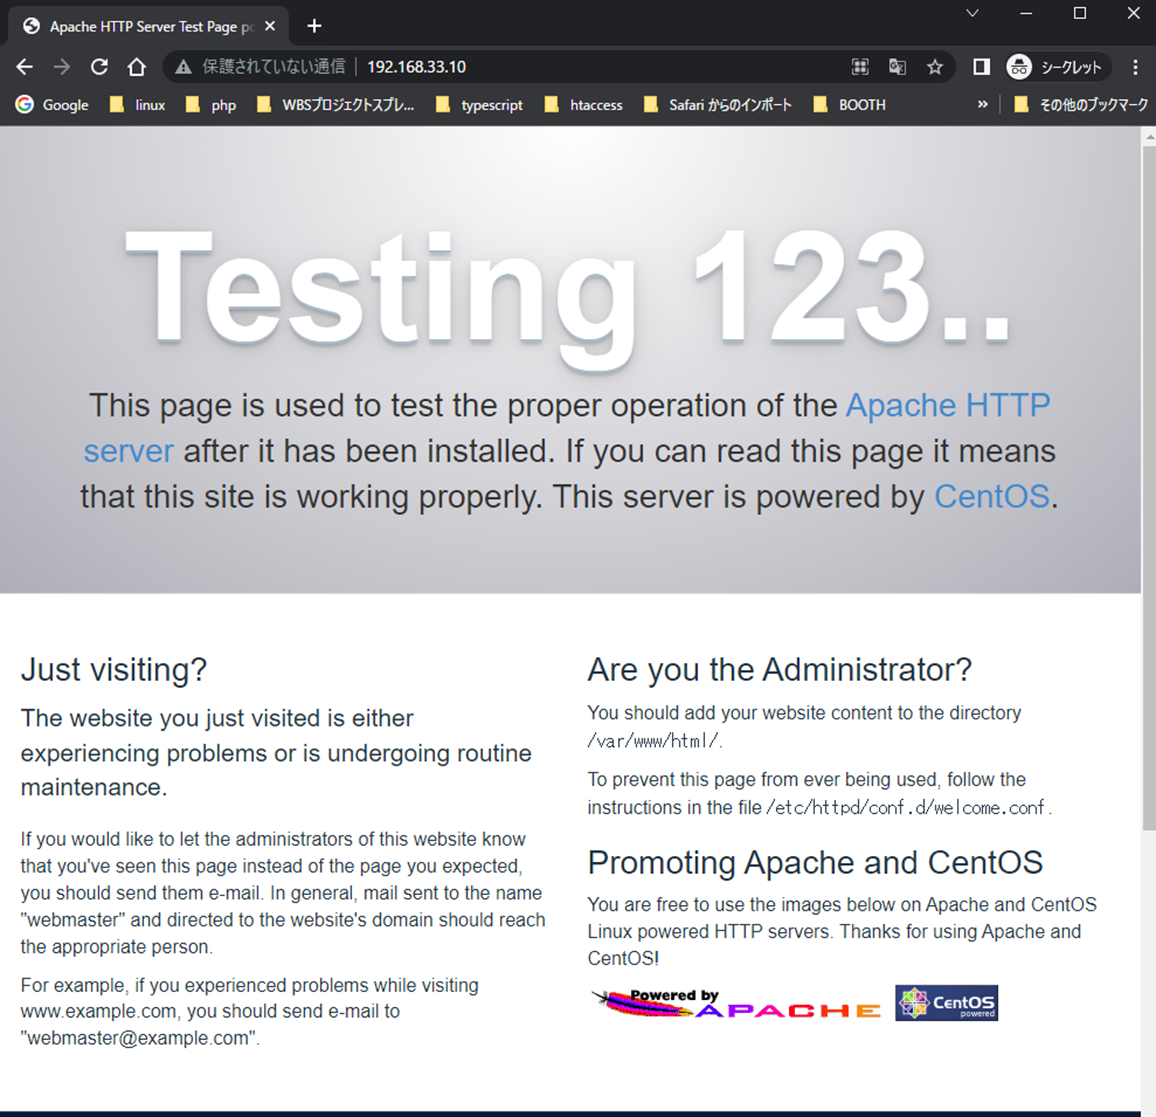
無事にapacheの初期画面が表示されましたか?
次にhttpd serviceの自動起動の設定を行います
自動起動とはサーバーを起動、再起動した場合に、自動的にhttpdを起動する事ができます。
下記のコマンドを実行してください。
systemctl enable httpd.serviceCreated symlink from /etc/systemd/system/multi-user.target.wants/httpd.service to /usr/lib/systemd/system/httpd.service.
次にhttpd serviceが自動起動が設定できたかを確認します。
下記のコマンドを実行して確認します。
systemctl list-unit-files -t service | grep httpd
httpd.service enabled
[root@localhost html]#
enabledなら自動起動設定が完了です。
次にhttpdの設定の構成を見てみましょう
下記はhttpdのフォルダー構成となります
|-- httpd
| |-- conf
| | |-- httpd.conf
| | `-- magic
| |-- conf.d
| | |-- autoindex.conf
| | |-- manual.conf
| | |-- php.conf
| | |-- README
| | |-- userdir.conf
| | `-- welcome.conf
| |-- conf.modules.d
| | |-- 00-base.conf
| | |-- 00-dav.conf
| | |-- 00-lua.conf
| | |-- 00-mpm.conf
| | |-- 00-mpm-itk.conf
| | |-- 00-proxy.conf
| | |-- 00-systemd.conf
| | |-- 01-cgi.conf
| | `-- 20-php.conf
| |-- logs -> ../../var/log/httpd
| |-- modules -> ../../usr/lib64/httpd/modules
| `-- run -> /run/httpd
まずは赤字のファイルのhttpd.confファイルについて説明します。
httpd.confファイルとは
httpd.confファイルはhttpdの初期設定値を設定するファイルです。
ここでは、DocumentRootディレクティブだけ説明します。
DocumentRootディレクティブとは、ApacheがWeb上に公開する場合に読み込むフォルダーへのパスを設定します。
一つのサーバーで複数のドメインなどを管理している場合は個別にDocumentRootを設定しますが、サーバーのIPなどでアクセスしてきた場合や、
ドメインに該当するものが無い場合はDocumentRootフォルダー内を参照します。
httpd DocumentRootを確認する
下記のコマンドを実行してDocumentRootの設定値を確認してみましょう。
cat /etc/httpd/conf/httpd.conf | grep DocumentRoot設定フォルダー
DocumentRoot “/var/www/html”
ここにhtmlファイルや画像ファイルを配置してブラウザから確認してみましょう
下記のコマンドを実行します。
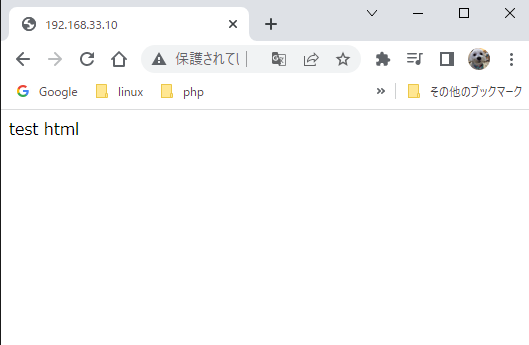
DocumentRoot にindex.htmlファイルを作成する
echo test html > /var/www/html/index.htmlコマンドを実行したらブラウザを更新してみます。
test htmlの文字が出力したら成功です。

コメント