
Hello, everybody! Today, I found some nice things at the “¥100 shop”. I found some good rubber bands and some naphtha for my camera repair. I usually buy tools, solvents and other small things there. Their quality isn’t great but they’re fine for my purpose. I have to save money because I am getting taxed more in my current job and penny-pinching is going to be normal for me from now on. Speaking of ¥100, I’ll show you one thing that I got for ¥100 and it’s something that I will consider to be a real “junkpot”.
Introduction:
Today, I am going to introduce to you the Nikkormat EL! This is going to be the first in my new Nikkormat series (Nikomat in Japan) and I’ll aim to cover every production model so long as it’s financially possible because running this blog isn’t cheap. The Nikkormat EL is Nikon’s first true electronic camera and it has Aperture Priority as its automatic mode. It was introduced around 1972 and it quickly become the backup camera of professionals. I would like to point out that this is very typical of the Nikkormat series of cameras, they’re so tough that pros love using them as backup cameras. One of our readers (Jerry) told me a story about a pro who somehow shorted his Nikon F3 while shooting at Hong Kong but he had a backup camera, one that will not short easily and that is a Nikkormat FT3. They are legendary for their toughness and the key to this is their solid build and the reliable and tough shutter by Copal, the Copal Square shutter. Despite being made and marketed to amateurs and prosumers, the Nikkormat is every bit as tough as the F-series and I will even go further by saying that the Nikkormats are even tougher because it has less parts to go wrong. “Simple is best”, that is my motto in life.
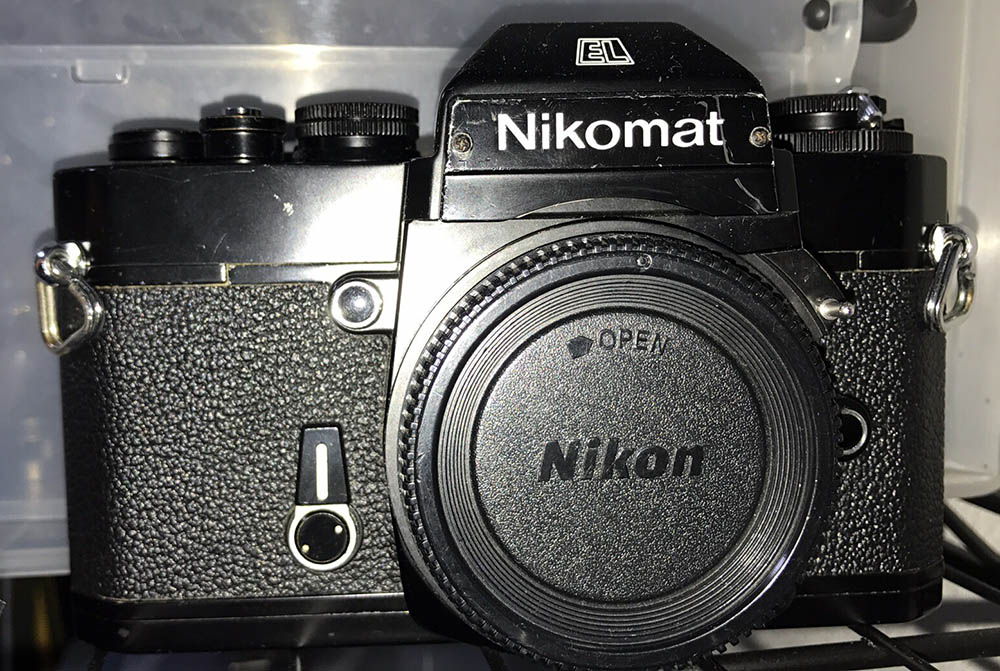
It’s pretty shabby but still presentable in some way. The most important thing is all of its functions still work properly. It’s an electronic camera so the shutter is less likely to give the wrong speed since there’s less mechanical parts and the timing is governed by a tiny quartz crystal (I suppose) within it.
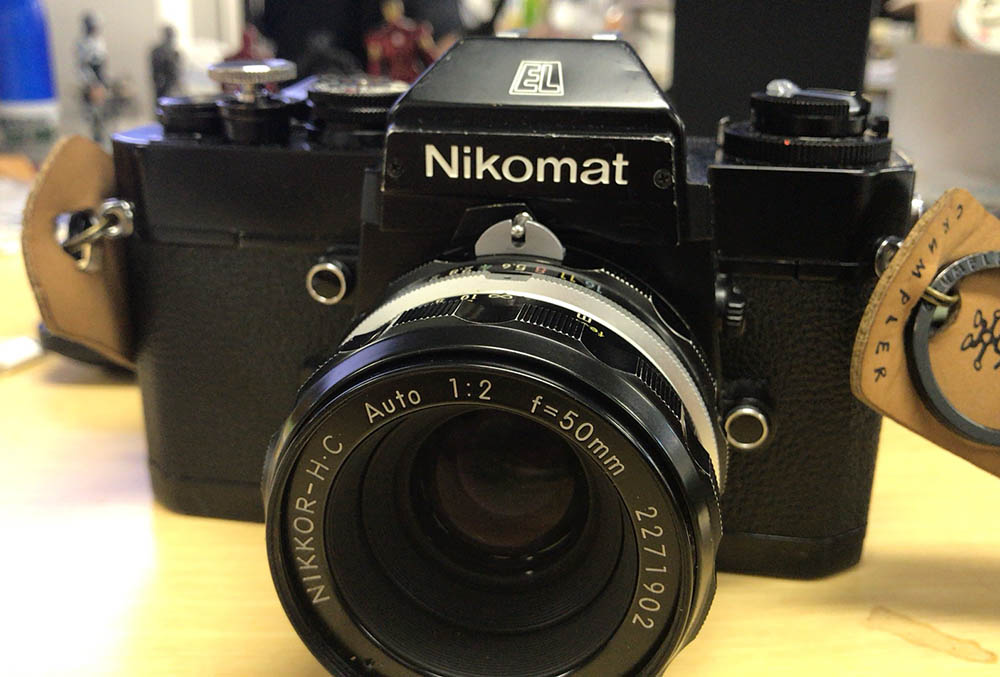
To be honest, I actually prefer this to the Nikon FE series because it feels more like a real camera in my hands than the smaller but more advanced ’80s cameras. This is my setup when Moriyama Daido sensei told me to “gambatte” in the streets of Shinjuku. I will not sell this camera and lens because of that and it has acquired a sentimental value now.
It has speeds from 4s to 1/1000s and the all-important A mode. I love shooting it like this because it frees me from worrying about my exposure settings. Despite having 1/1000s as its fastest speed, I find it more than adequate for my needs because I mostly use slower speeds for my photography. It uses the harder-to-find 4SR44 as battery and this camera is going to deplete it really quick! If you ran out of power, the camera can still be operated in 1/90s as its native mechanical speed. Always bring spare batteries with you when you are shooting with older cameras because older electronics tend to deplete batteries much faster than modern ones partly due to the aging components and the size of the wires.
The Nikkormat EL series is also the first and only Nikkormat to break-away from the old styling of the mechanical Nikkormat model in that they have the shutter speed dial in a more conventional place. It did retain that awkward aperture coupling mechanism that I don’t like so much but that’s not really a big deal to me, just cumbersome at times.
One of the things that I love about the Nikkormat EL is that it uses a conventional match needle in its meter. I’m more into needles than LED lights but it can be difficult to see at night with the tiny viewfinder. Despite the viewfinder being smaller than the flagship F cameras, it does offer a decent view but it’s not 100% like their bigger brothers.
So, why would you want a Nikkormat? Well, they are very charming cameras despite the quirky operation. They are also cheap these days depending on the model and for a small amount of money you can get a tough and rugged camera that you can use at places that you think is too dangerous for a more expensive camera.
What are the things that you should look for in purchasing a Nikkormat EL? You’ll want to have a clean viewfinder because cleaning it isn’t easy. All of the speeds should work, it should sound right and the shutter and mirror should be snappy. Check the batteries and open the battery compartment below the mirror and check for corrosion.
This video was made for the mechanical Nikkotmats but should be relevant to this model in some ways so I am linking it here. Check out my other videos just in case.
That’s all for the introduction, let’s begin with our partial CLA article!
Before We Begin:
If this is the first attempt at opening a lens then I suggest that you read my previous posts regarding screws & drivers, grease and other things. Also read regarding the tools that you will need in order to fix your Nikkors.
I highly suggest that you read these primers before you begin (for beginners):
Reading these primers should lessen the chance of ruining your lens if you are a novice. Before opening up any lens, always look for other people who have done so in Youtube or the internet. Information is scarce, vague and scattered (that is why I started this) but you can still find some information if you search carefully.
I highly recommend that you also read my working with helicoids post because this is very important and getting it wrong can ruin your day. If I can force you to read this, I would. It is that important!
For more advanced topics, you can read my fungus removal post as a start. This post has a lot of useful information here and there and it will be beneficial for you to read this.
Disassembly:
I always hated cleaning Nikkormats. All of them have viewfinders that are a pain to clean because you will have to remove so many things just to disassemble the viewfinder. The mechanical Nikkormats also have a shutter speed display that is operated by pulleys and cord. That is even a bigger pain to work with because putting it back can be difficult and if you snapped the cord, you’re in for a hell of a time. The Nikkormat EL isn’t too difficult if you have experience working on cameras but I’ll never encourage a beginner to open one. Leave this to the experienced repairmen, I don’t think they cost a lot to service and I can also say that the Nikkormat EL is tough so there’s not a lot of things that can go bad. I am aware that the needle of the meter can get stuck sometimes but how it got that way is a mystery because there’s no way you can mechanically jam the needle from outside. It’s probably caused by something else, I will update you when I know more about it.

Th bottom cover can be removed by removing a few screws. If your camera won’t fire or advance, this is the first place I that I will look into (depending on camera). Mine is firing properly so I don’t have anything to check here apart from cleaning away lots of dirt. It’s sometimes essential to lubricate the moving parts here. Only use fine oil for watches or launa oil. Dilute it in naphtha and use a syringe to apply it in small amounts. After the oil and naphtha mixture touches a seam, the naphtha will carry the oil into the small spaces and leave the oil residue there after the naphtha evaporates. The naphtha will also flush away any dirt that’s small enough for it to dissolve.

Once the bottom has been removed you can push the pin for the hinge until you remove it. Removing this pin involves pushing it with a rod and if it’s stuck you can strike at the metal rod using a wooden mallet to push the pin. A drop of oil helps if the hinge got a bit rusty. You can also use a pair of pliers with plastic lining to pull the pin if you don’t want to use a mallet, just make sure that you don’t bend or damage this pin.

Once the pin has been removed you can safely separate the back. I removed the pressure plate and cleaned the back very well using dish-washing liquid and a very stiff brush so I can clean all of the fungus away. Notice that the camera here is chrome and not black. It’s a different camera that I serviced on a different occasion.

To remove the top, we begin by removing the shutter speed dial. Set it to familiar speed so you will have a point of reference. Remove the 2 screws in the picture to remove the dial. Be careful, there’s a spring underneath it.

The shutter speed dial assembly can be broken-down into these subcomponents. Clean it properly with naphtha or isopropyl alcohol.

You can now unscrew this collar with your fingertips.

Next, remove the advance lever assembly by beginning with the cap. Use a rubber cup for extra friction, this unscrews by turning it counter-clockwise. The retainer underneath it should also be removed.

The advance lever now be removed. Do note that this thing is connected to the other end of a coil spring so be careful as you go or you may damage the spring The spring is there so that the lever will return to its position after you have cocked your shutter.

There’s another retaining collar here, unscrew it.

To remove the rewind lever, stick a small rod into the rewind fork and then unscrew the rewind lever by turning it counter-clockwise. Be careful not to snap the fork! I use small wooden chopsticks for this if I have some available.

Here’s how the rewind lever assembly comes off. Be careful of the small parts!

The film speed selector can be removed by unscrewing these 2.

Underneath it are 3 more screws that you will need to remove.

And the crown should come off just like this.

The name plate should be removed as well.

Finally, carefully unscrew the power check button from the top panel.

The top panel can now be safely removed. Be careful though, the wire for the flash is still soldered to the top panel and you don’t want to damage this part.

You can either unsolder this or carefully disassemble the whole assembly.

The moving parts here should be lubricated when needed using the naphtha-oil solution that I taught you earlier in this blog post. Just make sure that you don’t put too much oil.

To remove the prism, you must first remove these 2 screws. Be careful not to lose those 2 washers. Those aren’t just any washers, they aren’t conductive.

The PCB can now be lifted to reveal what’s underneath. There are 2 other washers here. I wasn’t careful and I almost lost these. The brace looks really dirty!

Removing the 2 retainer springs should free-up the brace. Clean it thoroughly with some alcohol, it also looks corroded and you will have to get rid of that as well.

We are nearly there! The 2 CDS cells can be removed by picking them off with your nails. Just be careful not to damage these because they are delicate. There are 2 screws here for you to remove. The screws atop the black plastic parts secure the housing of the CDS cells or photodiodes, the ones on top of the grey metal parts (left) are for something else.

The housing can now be removed, clean it very well.

Thank goodness, we can now remove the prism! All that effort just for one prism!

The shim for the prism can now be removed. Be careful with the shim and don’t lose it. It is used for calibrating your viewfinder image.

There are more things deeper inside this hole! They can be a bit tricky to reach.

To get to the fresnel screen and condenser lens, remove the prism’s basket.

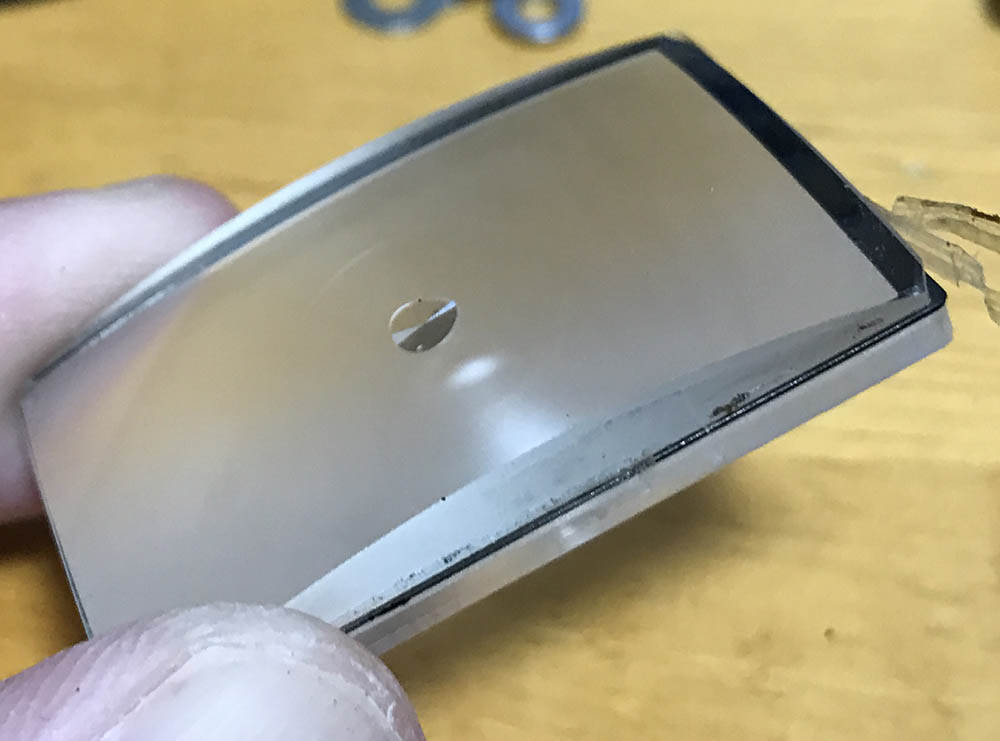
We have a problem here. The galvanometer’s needle is in the way, this is very typical of the Nikkormats and we have to remove it to proceed.

Remove the galvanometer and its housing by unscrewing some screws. Be careful while removing this, the needle can be very easily bent!

Here it is, see how thin the needle is? There is also a printed acetate scale underneath it. It looks fine here but I accidentally crumpled mine! I don’t recall what happened exactly but it felt more like an accident than anything.

Once all the obstructions are cleared, you can now remove the screen assembly.

Mine was very dirty, there’s fungus and other sorts of crud here.

Remove the optics from the housing with your hands but make sure to touch it only at its corners and edges when possible. The fresnel screen can be easily damaged so be careful while handling it. The smallest scar will show as a black spot inside the finder.
It comes in 3 parts, the condenser lens at the top, a fresnel lens at the bottom and a shim between them. Do take note of their orientation before you separate it.

Yuck, just look at that fungus! I cleaned it the same way I do with my fungus lenses. See how I do it by reading this article.
I am going to show you another way to clean the focusing screen and the bottom surface of the prism without removing the top and going too deep into the camera. This is easier but there’s more room for accidents because there’s not a lot of space for your fingers or tools to move. You can also easily scratch or damage the delicate parts here if you aren’t careful so please be careful when trying this method out.

The focusing screen can be accessed from the front by removing this brace. Remove this screw so you can remove the brace.

This is also a good chance to replace the foam bumper stuck to the brace. I replace mine with a 2.5mm strip of foam. Never actuate the mirror if the foam is desicated, this causes the mirror to absorb more shock than what’s acceptable and it can crack it.

Once the brace is gone you can flip the tab of the frame down to reveal the spring under it. Do note that the other end of the spring and frame sits on top of a ledge. Make sure it’s securely positioned on the ledge when you put everything back or you won’t close all of it properly and you can damage your camera.

The spring and notch aren’t symmetrical, there’s a notch on one side for both and this is where the shutter speed scale peeks-through in the viewfinder. Make sure that you put it back in the same position.

You can finally extract the focusing screen. You can clean the bottom surface of the prism with bent Q-tips to help you reach its corners. Blowing air also helps remove any dirt or dried foam in harder-to-reach places. Be careful when cleaning anything here so you will not damage anything here such as the meter’s needle and its scale. It sure is tight but this sure beats opening teh camera up just to access these parts. This is great if the camera is not super dirty and will save you lots of time.
That’s all for our partial CLA. You don’t fix what’s not broken and in this case, the camera is only dirty but everything works properly. Compared to the Nikkormat Ft series, this is a bit more difficult to clean because there are many electronic parts inside that you will have to be careful with. It’s not as complicated as later electronic shutter cameras but it’s still complicated enough to keep you occupied.
Conclusion:
Before you reassemble everything, make sure to clean and replace all of the foam inside the camera that’s accessible to you. Foam that’s close to the prism can be substituted with black electrical tape or strips of black vinyl. I cut scraps of black plastic from a notebook.
Be careful when putting back electronic parts. Cameras this old tend to have brittle PCBs and they can crack under pressure if you’re not careful. The solders can also come-off if you’re not careful. I hate soldering and this is one of the reasons why I hat working on all electronic equipment since the ’80s!

This spring needs to be wound-up before you put back the winding lever. The hook at the end of the spring can be annoying to position so I tired it with a thread.

The thread will help you pull that hook into position once you have reinstalled the lever.

Success! It’s up to you how on how much tension you want. So long as it comes back into place after winding then it should be fine. The string trick is the easy way to do this. This is something that I improvised on-the-fly or else I would’ve wasted plenty of time.

It’s now time to clean the old foam in the channels and the best way to do this is to use a wooden toothpick or wedge. Wrap it in lens tissue and saturate it with solvents.
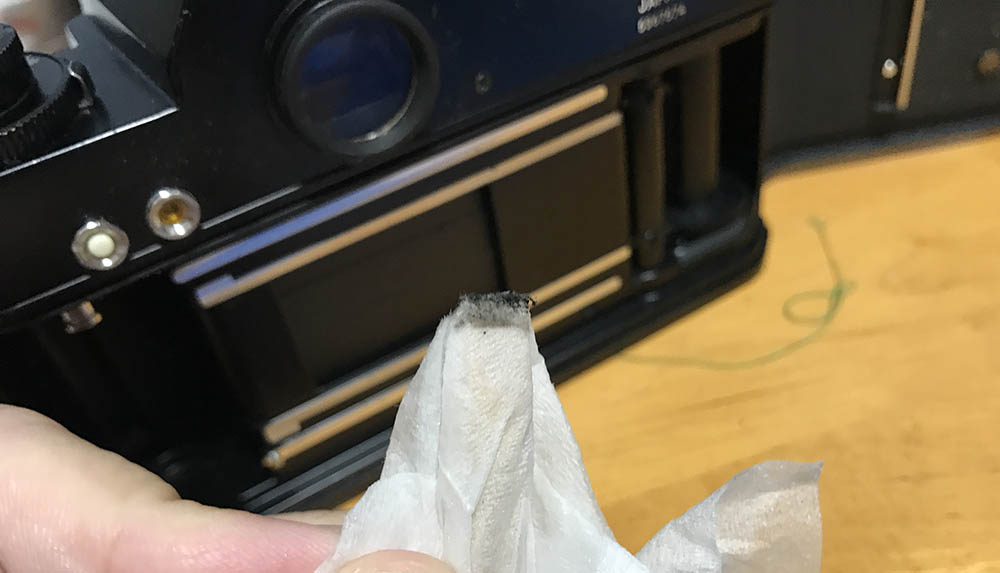
Carefully remove the old material until it’s all clean. Only when you’re sure that it’s clean can you begin putting on new foam. Read my article on how I replace old foam. The way I do it is the most common way here in Japan when it comes to old-school repairers. You may have your own preferences but I find this to be the cleanest and easiest way. Foam is used as some kind of a dust seal and is there more to keep dust out than to keep it light-tight. You can do without it but if you want to do a proper job the you’ll have to replace it.

After all that work, this camera is now functioning properly. Amazing considering that I got this for less than $1.00! One man’s junk is another man’s treasure! Seen here is a nice lens for this camera, the Nikkor-O 35m f/2 lens, a great combination.
I appreciate feedback from out readers and Henry has this to say:
“I discovered the the prism and its frame and retainer springs can and should be removed as an assembly. Because the circuit board lead wires are too short to allow room to re-hook the springs, it was much easier to hook them to the frame outside of the the camera and insert the entire assembly. Be aware once again that the wire leads going to the top circuit board can be shorter than the camera in this particular presentation, and may not allow as much room to work underneath the circuit board. Finally, it is not necessary to extract the meter needle assembly as far out of the camera as in this presentation. It is only necessary to pull it out enough to clear its slot. Be extremely careful and use a very close magnifier. The EL is very much more difficult and tedious to work on than an FTN.”
If ever you find anything wrong or have a suggestion that you think will be helpful, don’t hesitate to notify me.
Thank you everybody for supporting this blog. I wrote this article by request so I hope it will help somebody. I think there were 2-3 people who asked me to make one. Initially, I was thinking of writing another lens repair article but this seemed to be more urgent. If your camera has a bigger problem then I am afraid that this article will be of no help to you. Send it to a real repairman, that’s the only way to get that thing working. Just make sure he is competent enough. See you guys again next time and as always, share this with your camera group if you liked it and if you really really liked this then you can also do a small donation to the blog via paypal. See you guys again soon, I’m going to publish more articles in the coming days! Again, thank you all for the support. Ric.
Help Support this Blog:
Maintaining this blog requires money to operate. If you think that this site has helped you or you want to show your support by helping with the upkeep of this site, you can simple make a small donation to my paypal.com account (richardHaw888@gmail.com). Money is not my prime motivation for this blog and I believe that I have enough to run this but you can help me make this site (and the companion facebook page) grow.
Leave me some tip?
Thank you very much for your continued support!
$2.00
Helping support this site will ensure that this will be kept going as long as I have the time and energy for this. I would appreciate it if you just leave out your name or details like your country and other information so that the donations will totally be anonymous it is at all possible. This is a labor of love and I intend to keep it that way for as long as I can. Ric.

Jun 04, 2018 @ 22:52:54
Were you able to remove the collar under neath the film advance lever by hand, or by using tools?
Jun 21, 2018 @ 16:08:43
Hello.
I used a tool for that. Ric.
Jul 15, 2018 @ 07:31:46
First of all this was a good and handy presentation. I doubt I could have repaired my ELW without it. Corrections: In photo 21, the circled screw in the upper left to remove the viewfinder eyepiece is the wrong screw. It should have been the one below it. 2) Those aren’t diodes. They are the CdS cells. 3) I discovered the the prism and its frame and retainer springs can and should be removed as an assembly. Because the circuit board lead wires are too short to allow room to re-hook the springs, it was much easier to hook them to the frame outside of the the camera and insert the entire assembly. Be aware once again that the wire leads going to the top circuit board can be shorter than the camera in this particular presentation, and may not allow as much room to work underneath the circuit board. Finally, it is not necessary to extract the meter needle assembly as far out of the camera as in this presentation. It is only necessary to pull it out enough to clear its slot. Be extremely careful and use a very close magnifier. The EL is very much more difficult and tedious to work on than an FTN.
Jul 16, 2018 @ 15:45:29
Thanks, Henry!
I will revise it tomorrow after breakfast. Ric
Sep 08, 2018 @ 13:51:45
I found this very interesting my focus has always been the brute f2 but recently picked up a few elw’s and el2’s due to my age and the weight they are easier to handle with a winder. I did have and issue with a el the shutter will not fire I opened the base plate and I can fire it from the but it will not fire from the shutter release is the release electronic or manual the release on top seems to be jammed
Sep 16, 2018 @ 22:26:50
I think something got stuck at the top. I don’t know but I find working on Nikkormats to be very tiring at times. The Fs are easier to service. Ric.
Jan 02, 2019 @ 07:24:56
Thanks for your help with my nikomat. I had to take out focus screen out only to clean it. I had to separate the condenser and fresnel screen to clean both side of the condenser. Your pics helped me put the spring back correct.
Jan 02, 2019 @ 07:27:31
Nikomat EL that is.
Jan 10, 2019 @ 01:14:01
Thanks! Glad that helped!
Jan 10, 2019 @ 04:23:15
I thought I was going to get away with not taking the top off. Turns out the frame counter isn’t working. Now your top removal directions will help too. Thank YOU Rick. I love your blog!
Jan 19, 2022 @ 19:58:29
I found it easer to access and clean the focus screen by removing its tray from the bottom. That’s after removing the prism and view finder for cleaning from the top. After cleaning both FS laminates, I let the assembly fall into place with camera pointed up, then place upside down, insert retainer spring, then position lip of tray between body ledge while depressing retainer spring. The assembly then snaps into place.
Feb 06, 2019 @ 18:27:24
i just bought a Nikkormat EL and it works like a champ! Anyone else get that PING sound when you fire the shutter? I’ve checked and it definitely seems to be the stop down arm next to the mirror compartment. Wish I could quiet that noise…
Feb 08, 2019 @ 03:51:42
Hello.
You may want to see that side of the mirrorbox. small seals and rubber padding help baffle the noise and they can sometimes get corroded. The dampers are sometimes situated elsewhere so you may want to look for it. This require opening the camera up. Ric.
Oct 04, 2019 @ 20:42:09
I have shutter problem so I used your guide to take the top of and was a big help, I was hoping to see something obvious but no luck, maybe you can point me in the right direction,, Shutter speed does not at any speed, when I cock the shutter a depress the button it will open the shutter but it will not close until I put the lever in the off position, with the top off I can cock it and put it in the off position, set the timer and depress the button with a screw driver and it will fire. open and close shutter but still no change in shutter speed. it has a fresh battery, not sure if that makes a difference, thanks
Sep 04, 2020 @ 19:12:29
Hello! I used your article as a reference to open the top of mine. Somehow the previous owner had managed to push the battery check button fully inside and it was rattling in there…
I also opened up the front and disassembled the ring that reads the aperture to relubricate but now have another issue that I don’t know if I caused myself.
The light-meter reads differently when I stop down!
Shouldn’t the light-meter read the same with the lens aperture open (aperture ring in a position other than wide open) and with the lens stopped down? Or is there something I am missing and it should operate this way?
Jun 12, 2021 @ 13:19:08
OK, for anyone wondering, the camera is supposed to measure only with the shutter wide open.
If you have a non-nikon lens and you want to measure with the stop down method, the aperture indexing finger has to be in the “parked” position, fully clockwise (looking at the camera from the front), the same position you would have it in to mount a lens.
If you have a nikon lens on, engaged with the metering finger AND depress the DOF preview button, the light-meter will show an erroneous value.
It’s all in the manual.
May 23, 2022 @ 00:04:18
There’s a good schematic of the EL’s logic chain found on MIR’s site. The EL’s photo diodes measure the EV through the fully open ‘Auto’ lens. The ‘Auto’ lens are designed to fully open when they are mounted. The EV log value is then placed into a memory stack. The aperture setting and ISO are also placed into the memory stack. In Auto exposure mode, the computer then processes these values to determine a correct speed which is then presented via the exposure needle.
Stopping down does not override the ‘auto’ lens feature, as the fully open EV value retains itself in the stack. The stopped down value is a preview of the corrected EV sent to memory via the aperture ring.
Jun 19, 2022 @ 14:04:11
@ Tom Bowie, Could you point me to it? I’ve perused MIR’s site lots of times but can’t find the diagram you mention and it sounds interesting!
Jun 20, 2022 @ 13:28:13
MIR/Nikkormat/EL2/exposure control.
The Ai tab gives the computer memory stack the wide open aperture value.
While you are composing your shot, the memory stack is also storing the photo diode EV value, ASA/ISO setting and the aperture ring setting. The computer then presents the desired speed via the black needle. I believe the speed is determined and set PRIOR to shutter button release. After release, the mirror then comes up, the iris petals close down to their preselected aperture value, and the shutter released. When you stop down while composing, you are viewing what the film will record, without the benefit of the wide open light. Thus if the shutter button is pressed with the stop down lever held down, the computer presets a speed based on the diode EV light value through the stopped down aperture, rather than measuring the EV light value from the correct starting value taken from a wide open aperture.
Nov 10, 2020 @ 23:06:38
On removal of the bottom cover of an electronically nonfunctional Nikomat EL (shutter only fires at one mechanical speed), the bottom printed circuit board (part number 127) is missing. What does this mean? Thanks for your help.
Jan 30, 2021 @ 22:31:56
Hey there, silly question. I somehow lost one of the two set screws (part #875 in the service manual) that hold the brass base (part #544) for the spring that is used to set the flash type in the shutter speed control dial. I was just in there cleaning up some contacts. I seem to have gotten the shutter speed issue licked, but I now need a new set screw. Unfortunately, I don’t have calipers precise enough for that, do you by any chance know the size/thread of those set screws?
Thanks so much for this really helpful article!
Apr 27, 2021 @ 04:36:23
Hi!
I’ve bought a Nikkormat EL which have had some abuse on the aperture cam. It’s working as it should when the nameplate is off, but when I put it back it will get stuck. I can shim up the name plate, or use it without, is it difficult to replace the aperture cam, and does it need calibration after being replaced?
Jun 12, 2021 @ 13:34:13
You mean the cam assembly in this pic right?

The only job these have is to flip a hidden lever on the aperture coupling ring, so if you take them off the camera and straighten them out (should be easily doable), there won’t be any need to recalibrate anything afterwards. The two variable resistors on the other hand that are under the plastic cover nearby set the manual and auto shutter speeds, so you should try not to disturb them.
This whole plate comes off if you take the two cross-head screws out. (not the flat-head nuts that are close together and close to the variable resistors)
If you have the top-cover off the camera you will have 5-8cm of wire to work with.
here’s the (dis)assembly manual, what you want is on page 22
Click to access Nikkormat%20EL.pdf
If you are uncomfortable doing all this and shimming works, then do that. You should probably make a shim that doesn’t leave a gap behind the nameplate, as that would let too much dust in the cams and you would have to clean them periodically. (My guess)
Jan 31, 2022 @ 21:05:32
Thanks! You provided the needed information!
Now I could loosen the cam-plate without worrying about anything else would get disturbed.
Someone else had tried to loosen the cam-plate, but had given up, because they had not used nailpolish remover with acetone to soften the lock-tight first.
It was not necessary to straighten the aperture cams, since the aperture plate was actually forced back 1,5mm!! I don’t know how that could have happened, but I compared it with the Nikkormat EL that I had bought as a donor for the lens cams.
I just repositioned the lens cam plate, and now it’s working perfectly!
Which brings me back to the donor cam witch has a stuck shutter. How deep into the cam do you have to go to access vital parts so you can unstuck it?
No, the mirror lock up is not in the up position, I put in a fresh battery….
Nov 04, 2021 @ 21:51:58
Hello, I have a Nikkormat EL that was working fine until now when suddenly the fire button got stuck. I cranked the lever as per usual and suddenly I couldnt press the shutter button. What can be the problem ? Is it hard to repair?
Jan 19, 2022 @ 20:16:33
Hello Ric😜Great Blog site. Am getting smarter. I think.😳
I am now smart enough to know there is an easier way to replace a badly scratched EL2 mirror, than by ripping out the mirror box to detach its titanium tray. But I don’t know what adhesive Nikon used to secure the mirror to the tray. The manual shows that it’s not the same as the leatheret contact cement. Will sent $ for salmon burger shortly.😝
Feb 05, 2022 @ 19:47:15
I’ve got another Nikkormat EL which overexposes by 2 stops, and trying to adjust the automatic speed, does not have any impact at all. Could there be a bad soldering behind the adjustment control? Or do you have any suggestions to point me in the right direction?
May 20, 2022 @ 04:43:08
Great description. I have a beautiful EL BUT the meter does not seem to turn off. If I close the advance lever and look through the viewfinder the black needle responds to light. I can onlky guess that the meter is staying on ?. Have you seen this before? There are NO repairmen left in Australia that I know of. I’ll have to attempt it myself. Any hints as to which switch I’m looking for? Thanks,
Jul 16, 2023 @ 02:18:15
I’ve disassembled and cleaned several ELs and EL2s with reasonable
success, but I’m stumped on one item. Each time I reassemble the film advance lever with the spring tensioned half a circle and with the silver
cap on lightly, the advance action is impeded and the lever does not return. The spring is designed to allow only a half turn counter clockwise for tension. To my surprise today, I installed the lever without hooking the spring and the film advance action is normal, it returns to the offset position with no binding. Can anybody explain this
or help me out on this?😳
Jul 16, 2023 @ 12:46:30
Hey, this happens to me almost everytime I have opened my ELs. It is caused by slightly trapping the spring under the lever (as far as I remember, haven’t opened my ELs recently). If I tension the spring and put the lever on haphazardly, after tightening the lever screw it is very stiff and does not return correctly. It is always fixed by just redoing the steps of installing the lever and tensioning the spring more delicately without trapping the spring.
As for why it works without the spring, well the spring could just be helping the rest of the mechanism with the return of the lever and not be the main return force. However, since Nikon decided to put it there, I wouldn’t omit it.
Jul 16, 2023 @ 21:38:45
I think you hit it on the head Loukas, since there can be no other reason.
And thus the thread trick, placing the lever square on top, then tensioning the spring. Guess I owe a revisit to my humble collection.
Thanks. Oh, buy the way, I found EL2 easier to work on. Easier prism access, no PCB or foam except below the viewfinder.😊
Sep 09, 2023 @ 13:38:34
Hello, thanks for that detailed explanation, do you know how you put back the shutter speed dial? im stuck putting it back together and everything i try doesnt seem to wort. Thanks in advance
Sep 29, 2023 @ 18:21:25
Hello,
I would need some help from Nikkormat gurus
I have a Nikkormat EL and the problem is the following: the meter does not seem to work at f/1.4 and f/2. I attache the lens and I index it, the red dot ont he indexing ring is at 1.4, so indexing must be correctly done.
Everything works fine between f2.8 and f16, the meter works perfectly (tested against a digital camera, and shutter speeds are spot on at each aperture).
The problem: as I turn the aperture ring on the lens to f/2 and/or further to 1.4 the meter immediately jumps to the top of the scale and stay there without any movement. I tried this at different light conditions from bright sunlight to complete darkness and nothing changes, so the problem has nothing to do with the EV limits of the meter.
As soon as turn the aperture ring to 2.8 it immediately jups tot he correct shutter speed and works perfectly again.
Somehow it seems that the meter simply does not sense 1.4 and f2 or something start to be incorrectly working below 2.8.
Does anyone have any idea what could cause this, and where should I look to solve this?
Sep 30, 2023 @ 05:07:37
…..it happens with any other lens as well regardless of their minimum f number. The meter at the lowest two F numbers does not work.
Mar 31, 2024 @ 18:49:04
My EL had the same “ping” that illnagas mentioned. Never did figure out a way to get rid of it, and yes, it did appear to come from the same place that he mentioned. Wonderful cameras though. Mine gave perfect exposure, but that ping noise drove me a little crazy so I sold it. The only other downside to the EL and all the other Nikkormats I owned (besides the weight, LOL) was the viewfinder magnification. With my glasses on I couldn’t see the whole frame and ended up getting an n8008s. It’s not nearly as fun to shoot as a Nikkormat, although it’s just as heavy, but it’s the best SLR I’ve ever shot because it has everything, including that high point viewfinder that gave me the whole frame to see w/ my glasses on.